How to Change Front End Assemblies on Airsoft Guns
How to Change Front End Assemblies on Airsoft Guns
-
-
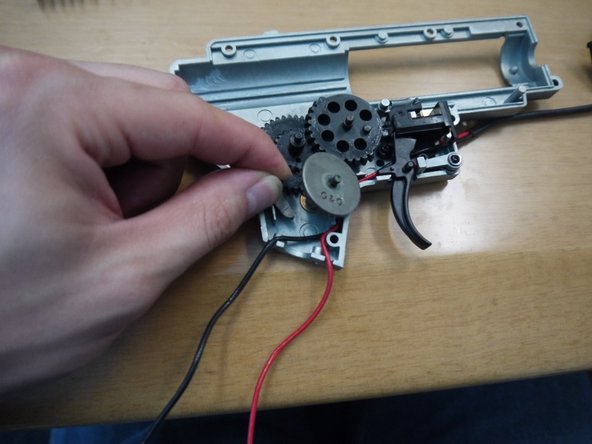
Reinstall the selector plate by sliding the forepart end in commencement.
-
After the selector plate is dorsum in place, reinstall the spring by carefully popping both ends back on to the nubs on the selector plate and cutoff lever. A dental pick is helpful for this.
-
-
-
Put the wire harness back in identify past sliding the lower portion downwards into the slot in the gearbox, then pushing the top cease back down. There is a round hole in the harness that corresponds to a small peg in the gearbox. Don't forget to hook the trigger plunger jump back onto its post.
-
Reinstall the small spiral that holds the wire harness in place.
-
Brand certain the trigger leap is fastened to the trigger as shown.
-
-
-
Reinstall the trigger. It'southward easier to rotate the arm of the spring upwards subsequently the trigger is in place. Refer to the get-go and second pictures.
-
Pull the trigger to ensure that it slides smoothly, pushes the plunger forward, and resets properly when released.
-
-
-
Place the gears back in the gearbox starting with the spur gear. Check to brand certain that there are no loose shims effectually.
-
Before installing the bevel gear, identify the anti-reversal latch in and plough information technology clockwise and so that spring tension volition button information technology up confronting the bevel gear. Refer to the third motion picture and be sure you lot are installing it exactly equally shown.
-
-
-
Afterward the gears are in place, reassemble the cylinder assembly so that it resembles the pictures. The air nozzle must slide into the groove in the tappet plate.
-
Place the unabridged cylinder assembly back into the gearbox, and reattach the tappet plate bound every bit shown.
-
-
-
Press on the air nozzle to ensure that it slides back and springs forwards when released.
-
Reinstall the master spring and jump guide. Placing a tool such every bit a thin screwdriver into the rear of the leap guide tin can help in pushing the jump in and holding the guide down.
-
Identify the correct half of the gearbox back on top. It is best to start from the rear, at the spring guide, then pull the gearbox half forward over the cylinder head.
-
Make sure all of the gears, anti-reversal latch, and trigger line upwardly in their corresponding holes.
-
-
-
Ensure that the gearbox is fully closed before reinstalling the screws. Forcing the screws in while the gearbox has misaligned parts will damage the gearbox.
-
-
-
Make certain that the selector is set to semi-car, and place the gearbox back into the lower receiver.
-
-
-
Reinstall the small receiver pin, making sure to place information technology exactly as shown in the starting time picture; from the left side, with the knurled terminate pointing upwards.
-
Reinstall the rear takedown pin from the right side.
-
-
-
Reinstall the magazine take hold of, then place the bound on the post and the push button on top of it. Tighten the screw that holds the push button in place.
-
-
-
Reinstall the pistol grip by outset guiding the two wires from the gearbox into the respective holes in the pistol grip.
-
It is recommended that a magnetic screwdriver be used to reinstall the pistol grip screws. Call back to arrange the 2 screws diagonally from one some other.
-
-
-
Suit the wires so that both are against the rear of the pistol grip. Place the motor in the pistol grip, making sure that information technology slides in freely and bounces back from spring tension after y'all push button down on information technology.
-
-
-
Attach the wires to the motor terminals, making sure to friction match the ruby-red wire with the positive concluding and the black wire with the negative one. Positive terminals are marked with a "+"
-
Reinstall the pistol grip plate as shown, and be sure not to compression or mash up the wires.
-
-
-
Tighten the pistol grip plate screws.
-
Slide the receiver finish plate dorsum onto the lower receiver, and reattach the buffer tube.
-
Replace the buffer tube end cap.
-
-
-
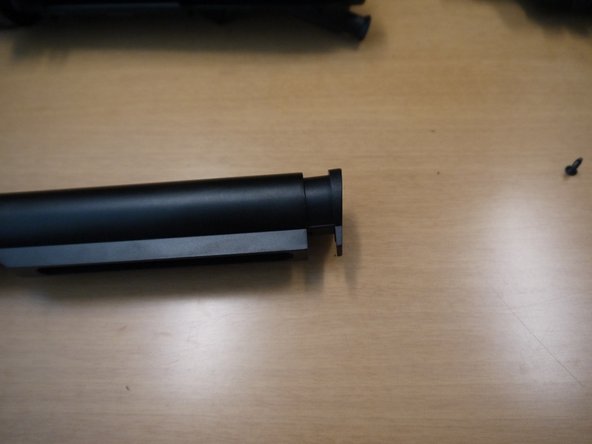
Reinstall the buffer tube end cap spiral. It is threaded into the plastic cap, so do non apply too much torque.
-
Elevator the collapsible stock adjustment lever, and slide the stock downwardly onto the buffer tube.
-
-
-
To reassemble the hop-up unit of measurement and barrel, kickoff slide the hop-up bucking onto the barrel, making sure to slide the line in the bucking into the groove in the barrel.
-
Then slide the butt and bucking into the hop-upward unit of measurement with the groove in the butt facing downwardly, and install the green prune.
-
Finally, slide the brass ring around the barrel and into the forepart of the hop-upward unit.
-
-
-
Slide the upper receiver back onto the lower receiver, arranging the wires as shown. You lot will need to lift the charging handle over the nub on the peak of the gearbox, just every bit you did when disassembling the gun.
-
After the wires take been slid through the upper receiver, push the front takedown pin back in.
-
-
-
Reconnect the wires, put the handguard dorsum on, and the gun will be fully reassembled.
-


Conclusion
To reassemble your device, follow these instructions in contrary club.
Embed this guide
Cull a size and copy the code beneath to embed this guide as a small widget on your site / forum.
Preview
How to Change Front End Assemblies on Airsoft Guns
Posted by: valentinepasky1958.blogspot.com
0 Response to "How to Change Front End Assemblies on Airsoft Guns"
Post a Comment